¶ BOL User Guide
The BOL Module will contain the tools needed to create a Master’s Instructions, BOLs, and more. Upon entering the page there will be 2 tabs one will be for your Commercial BOL and one will be for your Military BOL. As of 12/14/2020, only the Commercial BOL is complete (Military BOL will come as part of Phase 2 of development).
¶ Commercial Tab
As mentioned above, the Commercial BOL Tab will contain your Commercial Cargo as well as your Commercial Master’s Instructions & BOLs.
¶ Advanced Search, The Most Advanced Thing On This Page
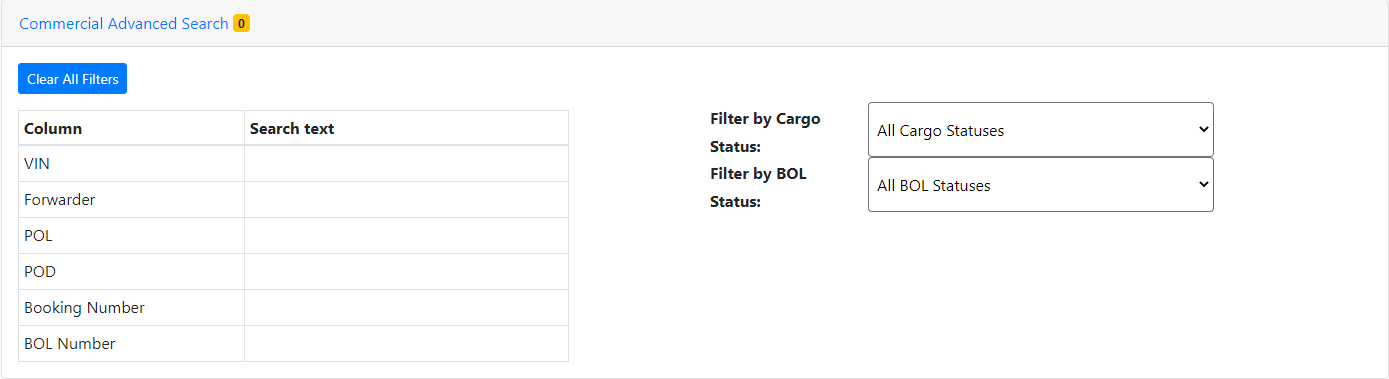
The advanced search is relatively self-explanatory, you can type in whatever you want to see and it will do its best to show only those entries on all 3 tables below.
For example; if you typed in ‘BOLNumber123’ into the ‘BOL Number’ search it will show only the Cargo in the cargo table that is attached to the BOL ‘BOLNumber123’ and only the BOL ‘BOLNumber123’ in the BOL table, while the Master’s Instructions table will show all of the Master’s Instructions because Master’s Instructions will never contain a BOL Number.
¶ Cargo Table, Everything We Got(Almost)
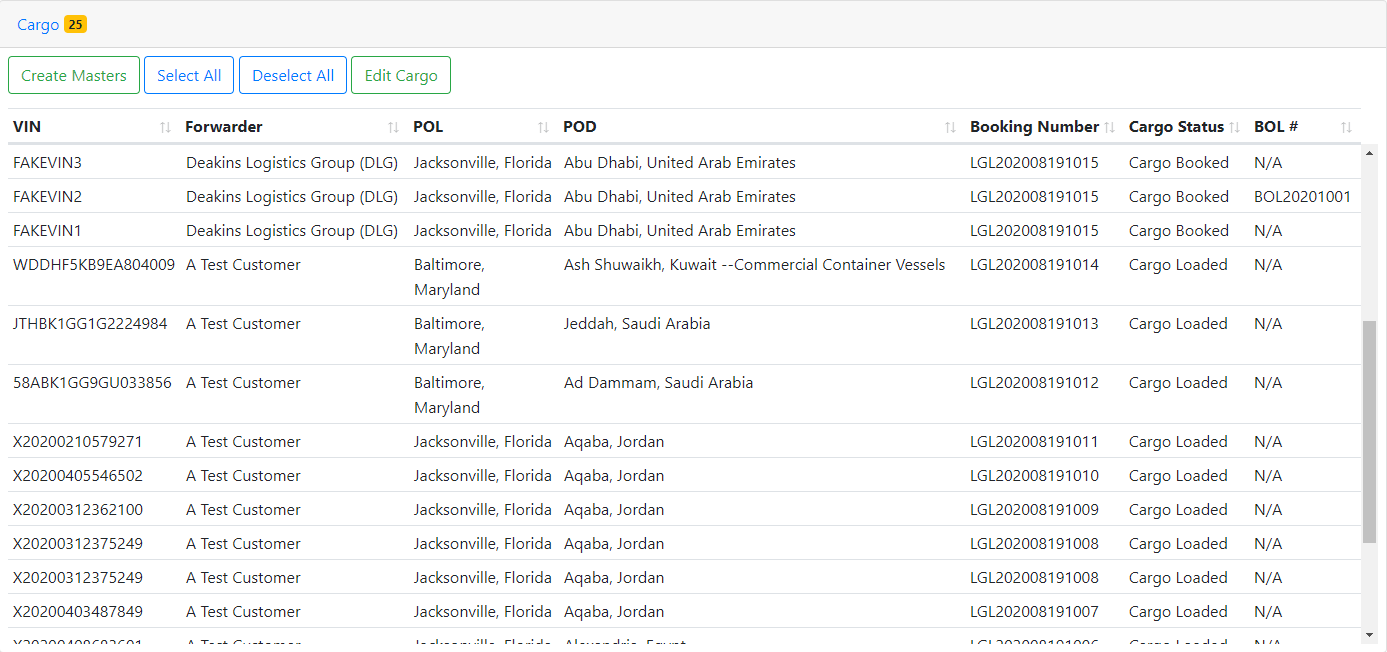
The Cargo Table will contain all of the Commercial Cargo that is currently in the system, this includes cargo that has come in through the Booking module or the Inventory module. The 2 main functions in this table are ‘Edit Cargo’ and ‘Create Masters’.
The ‘Edit Cargo’ does what it says and will allow you to edit the cargo and any rates that are attached to the selected cargo.
The ‘Create Masters’ can be a bit more complicated; you must first select the cargo that you wish to add onto your Master’s instructions and then hit the ‘Create Masters’ button. There are slight restrictions put in place for which pieces of cargo can be placed onto a Masters/BOL together; for example only cargo from the same Forwarder can be on the same Masters/BOL, so cargo from ‘Deugro USA Inc’ and cargo from ‘Deakins Logistics Group(DLG)’ will not be allowed onto the same Masters/BOL. They must also have the same port of discharge.
Once you have successfully selected your cargo it will bring you to the General Tab, where you can enter in values to be shown on the Masters/BOL. Note that the Forwarder, Shipper, Consignee, and Notify Party will drop down suggestions when you begin typing. These suggestions come from our database of customers and are purely suggestions and you are not required to choose one of them, however if you do choose one and they have an address in our database it will be automatically entered into the address field; which can also be changed freely.
On the Cargo tab you will allow you to enter in the AES ITN and HS Code of your Cargo. You will also be able to add/remove cargo from the Masters/BOL by either clicking the “Red X” button next to each piece of cargo or by clicking the “Add Cargo” button. By scrolling to the right of the page you can also change the order of the cargo as well.
On the Rates tab you will be shown the combined rates of the of all of the cargo. You can also add new rates to cargo using the “Add Rates” button, which will bring up a new table with all of the cargo currently on this Masters/BOL as well as the ability to enter new rates to be added to the selected cargo.
Finally, on the Options tab, there are several options for how you wish for the final BOL to be displayed, once a BOL has been created from this Master’s Instructions.
¶ Masters Table, BOL Lite
The Master’s Instructions table will contain all of the Master’s Instructions created that has not yet been turned into a BOL.

Buttons:
| Button | Purpose |
 |
The create button; these Master’s instructions can be turned into a BOL by either clicking this button on each Master’s Instructions or by choosing multiple Master’s Instructions and hitting the “Create Bills” button. |
 |
The edit button; you can also edit Master’s instructions by clicking on this button, this will open up a form identical to the one previously seen in when first creating a Master’s Instructions. |
 |
The void button; This button simply asks if you are sure and then voids the Masters/BOL |
 |
The history button; This button will open up a new tab with the history of this Masters/BOL, including any edits that have been made including the time and person who made those changes. These tabs can be expanded to show what the Masters/BOL looked like during that stage of its life. |

¶ BOL Table, The Final Boss
The BOL table will contain all of the Bills of Lading that have been created in the system, many of the buttons work exactly the same as in the Master’s Instructions except for the create
button which has been recycled into the approve BOL button.

The “Edit Button”, “History Button" and “Void Button” have all remained the same from the Master’s Instructions.
As mentioned above, the “Approve Button” can be used to approve BOLs, another way to approve a BOL would be to use the “Approve Bills” button which will allow you the ability to approve multiple BOLs at once.
The new “Mass Edit” button will allow you to edit multiple BOLs at the same time. This button will open up a window identical to the regular edit window, however all fields will be empty; any field that is filled out on this window will automatically change those values on all of the selected BOLs. For example; if I chose BOL1 & BOL2 to be ‘Mass Edited’ and filled the Shipper Name field to be ‘Shipper Dude 123’ then both BOL1 & BOL2 would have their Shipper Name be ‘Shipper Dude 123’.
Buttons:
| Button | Purpose |
 |
The single “Download Button”; This is used for single downloads will download a report of the selected BOLs in the form of an excel sheet. The green, “Download” button can be used for mass downloads. |
 |
The split button; this is for splitting a BOL, this button will open up a window showing you all of the cargo currently on this BOL. You will be able to pick and choose cargo to split off into another BOL, this new BOL will be identical to the original differing only in the BOL Number and Cargo attached. |
 |
The preview button; this button will open up a window with the full BOL that is available for download. |
 |
This button will download the BOL Manifest |
¶ The Following Master's Instructions/BOL Will be Deleted, No Bill Left Behind
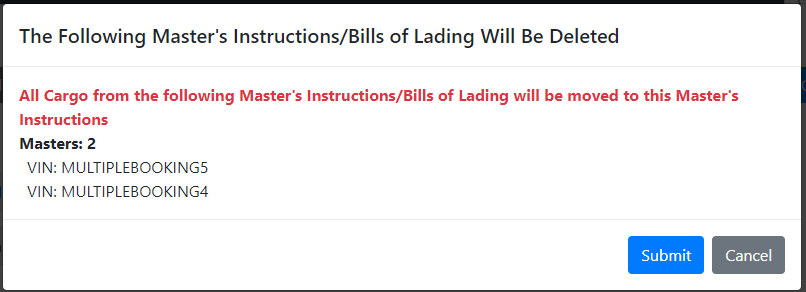
Every so often when you create or edit a Masters/BOL this window will open when you try to submit, this signified that by submitting these changes will remove all of the cargo from a Master’s Instructions/BOL prompting it to be deleted.
For example: let’s say you have VIN1 and VIN2 on BOL1. You then decide to create BOL2 and on that BOL2 you want to add in VIN1 and VIN2 to that cargo, the system will not allow for VIN1 & VIN2 to be on both BOL1 & BOL2 and will therefore remove VIN1 & VIN2 from BOL1 which would leave the BOL with no cargo, so instead it will be deleted.
¶ Important Notes
If you have any questions or issues to report regarding the BOL Module, please submit a help desk ticket with “BOL Module Help/Bug” in the subject line.