¶ Inventory User Guide

Upon loading the Inventory page, you will have two tabs to choose from; ‘Port Cargo’ & ‘Search Cargo’. The ‘Port Cargo’ tab is where you can upload cargo Excel sheets and manage EDI's for the Selected Port.
To begin you must select a port to view. After a port has been selected successfully the page will load and you will have three sections to view; ‘Port Data’, ‘Port Uploads' and ‘Port Cargo’.
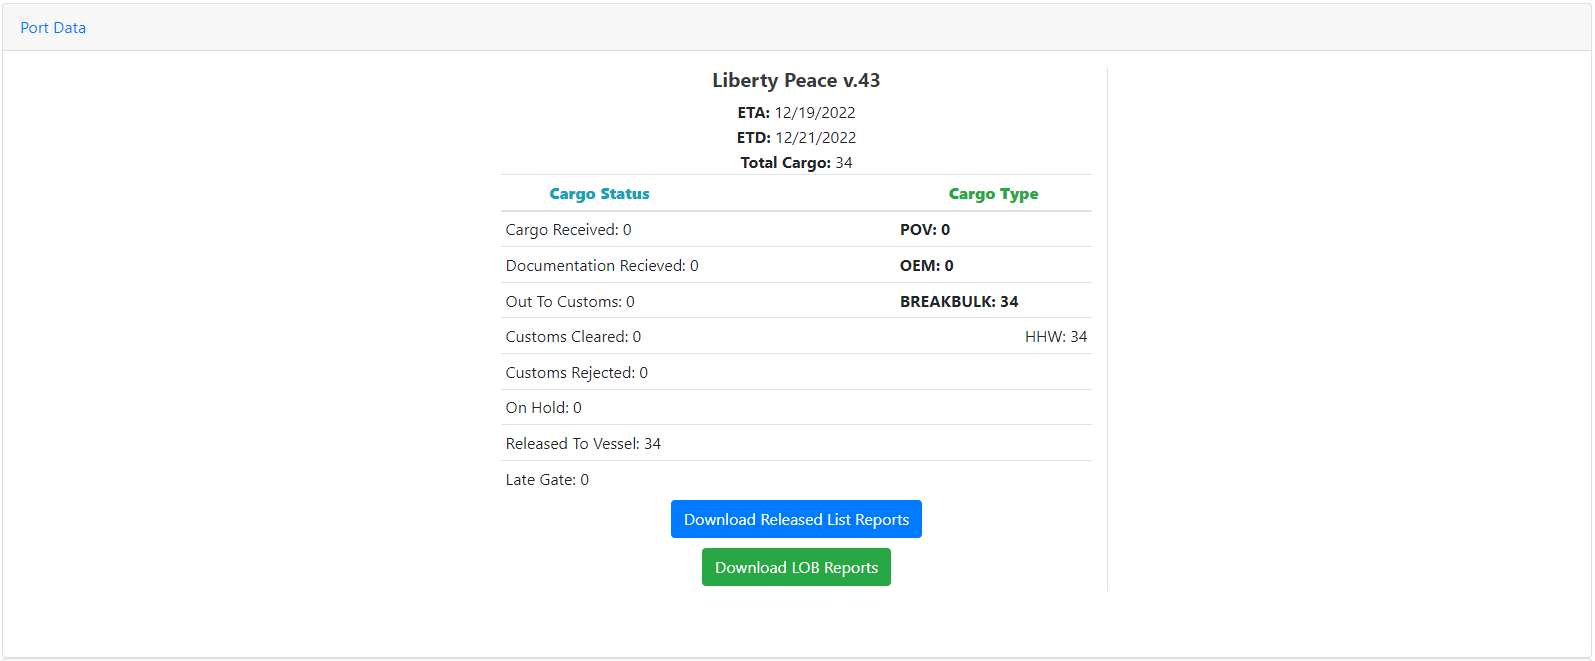

The Port Uploads has been designed to accept a very specific Excel sheet, which can be found by hitting the ‘Download Excel Template' button. We have tried our best to make the checks as lenient as possible when accepting Excel sheets. Not only will the system accept files that contain a single sheet inside of a workbook, the system will also accept workbooks that contain multiple sheets. The way that the system chooses which sheet to work with will be by the name of the sheets themselves. The system will first look for an excel sheet that is named as ‘[PORT NAME] DATA'; and if that is not found, then the system will simply look at the first sheet in the workbook. And yes, the two blank rows at the top of the excel sheet before the headers are necessary. Along with correct headers, certain columns in the Excel sheet must also be present, such as Booking Number & VIN/TCN.
On the chance that you upload an excel sheet that does not fit the format, there will be detailed error messages that explain what is wrong and will prompt you to fix them before continuing the upload. For example, should a row be missing a booking number, the error message will display the exact row number(s) that is missing a booking number; making it as easy as possible for the user to fix any errors. There are also various other checks to help users figure out what will and will not work when uploading cargo, as well as point out any mistakes present in the uploaded Excel sheet.
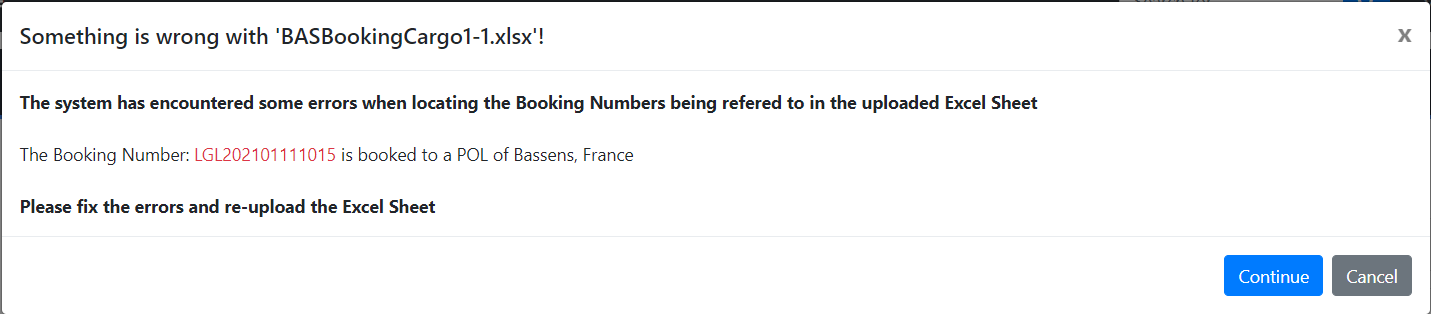
Another example of a check we have in place is checking to make sure that the same Excel Sheet has not been uploaded before.
NOTE: This does not mean that the name of the excel sheet must be different. Users CAN upload two excel sheets with identical names, so long as the contents of the Excel sheet are different.
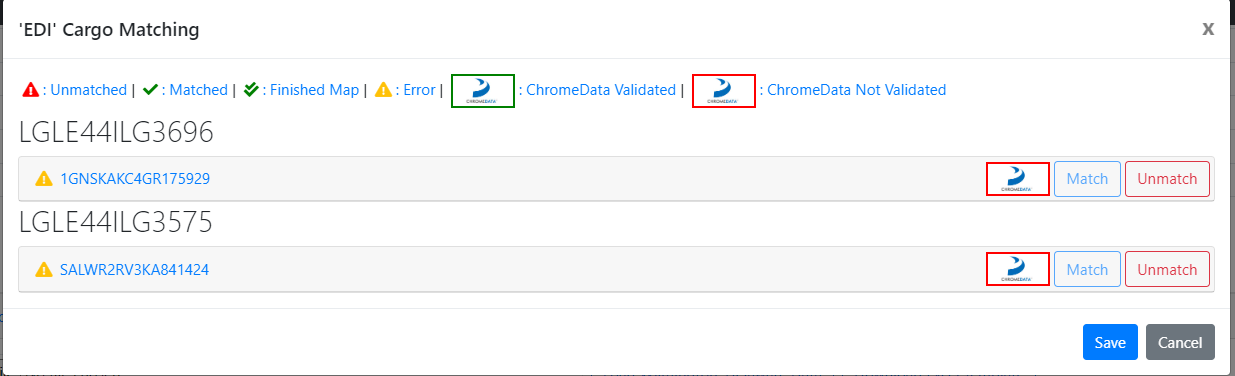
Unless the cargo in the system already has a VIN associated with it the system will have a hard time deciding why line six of the excel sheet should be matched with x cargo on a specific booking. This is where the auto-matching function of the system comes into play. The system will first check the Booking associated to this row using the Booking Number, and then depending on certain variables such as; number of cargo in the booking, cargo subtype, cargo dimensions, and cargo rates, the system will try its best to automatically match rows of the excel sheet to booked cargo in the system. Above we have an uploaded sheet with 5 pieces of cargo and all of them are under different stages of matching.
NOTE: All of the matches can be opened up to view the values from the file as well as the values currently in the system. Simply click the VIN on the left hand side.
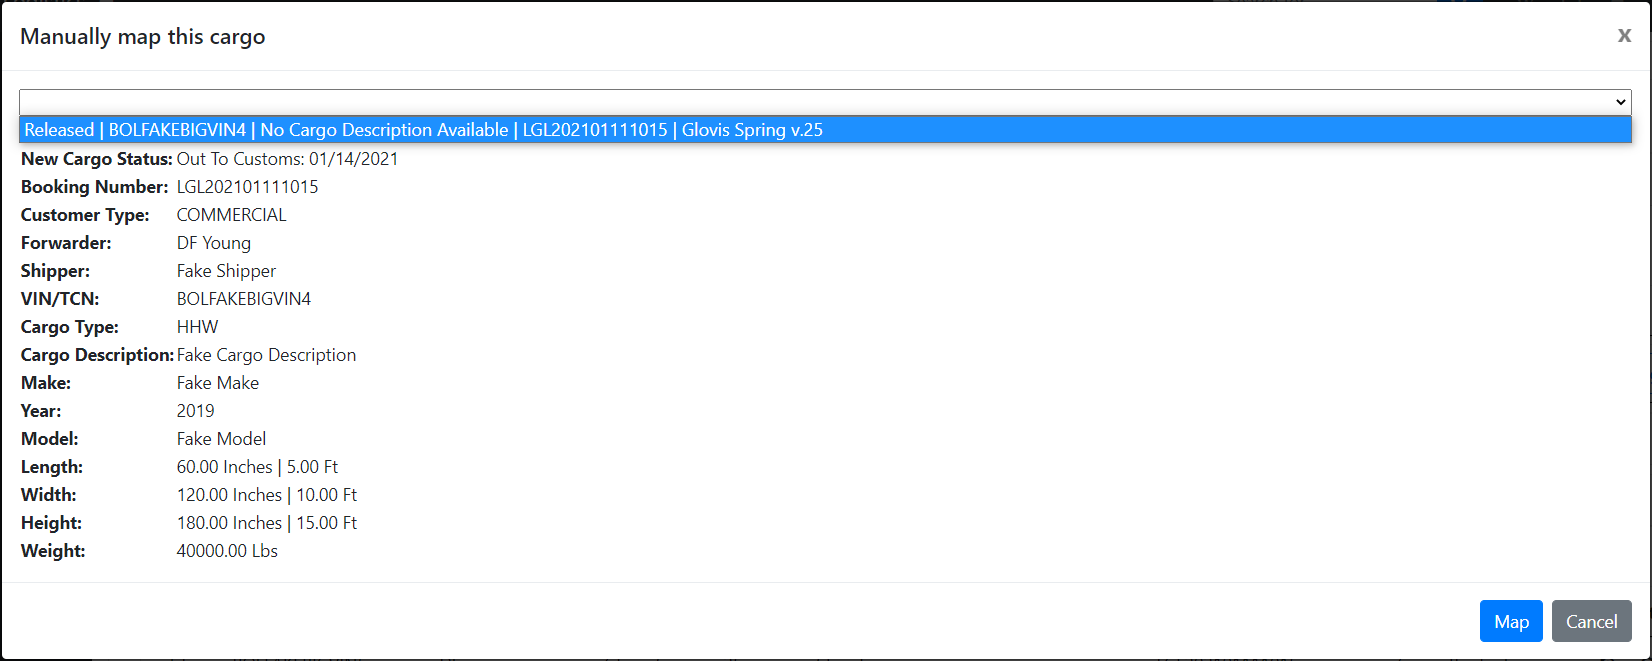
Un-matched: The first stage of matching is the Un-matched stage, represented by the red exclamation mark. This means that the system was unable to automatically match it to something in the system. Should this happen the ‘Match’ button.
When uploading cargo there will be an image of a whale that appears next to the match button. This is chrome Data validation. If the VIN is valid, it will appear green as seen in the Icon bar. If the VIN is not found it will appear red. Manual validation of the VIN will be needed.
Matched: The second stage of matching is the ‘Matched’ stage; represented by the green check mark. This means that the system was able to automatically match this row of the file to an existing cargo in the system. Of course the system may not always be correct, so the ‘Unmatch' button can be pressed, which will move the cargo to an unmatched stage and the user will be able to manually match it themselves.
Matched But Incorrect: The third stage of matching is represented by a green exclamation mark. This means that the system has detected that matching this piece of cargo will revert changes made by the user. For Example; suppose the port sends an on ground report and changes the status of BOLFAKEVIN1 to Customs Cleared. Then later on in the day a user decides to update BOLFAKEVIN1 to Released, if on the next day the on ground report comes in and has not been updated so it still says that BOLFAKEVIN1 should be of status Customs Cleared, the system will place this into this third stage of matching which will save all of the values in the row except for cargo status and the dimensions.
Final Match: This is the final stage of matching, which will only be available once a sheet has already been saved once. This is represented by a double green check and means that the row was matched to a cargo in the system and the values in the system have been updated. These are changes that are final and as such the rows can not be matched to a new piece of cargo. These are rows that are essentially ‘done and finalized'.
NOTE: The user is not expected to fully match a file before saving it. Files can be half matched and saved for later. But users should be aware that any rows that are ‘Matched’ or ‘Matched But Incorrect’ will be saved and moved to the ‘Final Match’ stage where they will no longer be allowed to be re-matched. Should a user only partially match a file and save it. The file will appear in the Uploads table below; simply click the ‘Continue Matching’ button to re-open the matching window from where it was previously left off.
¶ Unbooked Cargo
¶ Adding Unbooked Cargo
In addition to the regular cargo matching described above, it is possible to add military cargo that does not currently belong to a booking, such as Loaded Not Booked cargo. This can be accomplished by adding the cargo details to an On Ground Report and uploading like normal in the Inventory Module.
To upload unbooked military cargo, several pieces of data are required: a TCN, Final POD, Vessel Name, and Voyage Number.
- Final POD: Uses Name, Short Name, Port Code, or UN Code. Military Code is NOT currently supported due to Port Code / Military Code conflicts (e.g. Charleston Military Port, South Carolina, CHARLESTON MILITARY PORT, CHS, or USCHS - NOT 1PK)
- Vessel Name: Uses Name, IMO Number, or Code (e.g. Liberty Peace, 9777890, E - Name is not case sensitive, so Liberty Peace, LIBERTY PEACE, LiBeRtY PeAcE will all work, but Peace will not)
- Cargo uploaded without a TCN will be automatically removed from the list. If you do not yet know the TCN, you must use a placeholder TCN (which can be changed later in Edit Cargo)

If regularly booked cargo is being matched, that modal will appear first. Once the mapping is complete, clicking Continue will move on to the Unbooked Cargo Modal. If no regularly booked cargo matching is listed in the On Ground report, the Unbooked Cargo Modal will open directly.
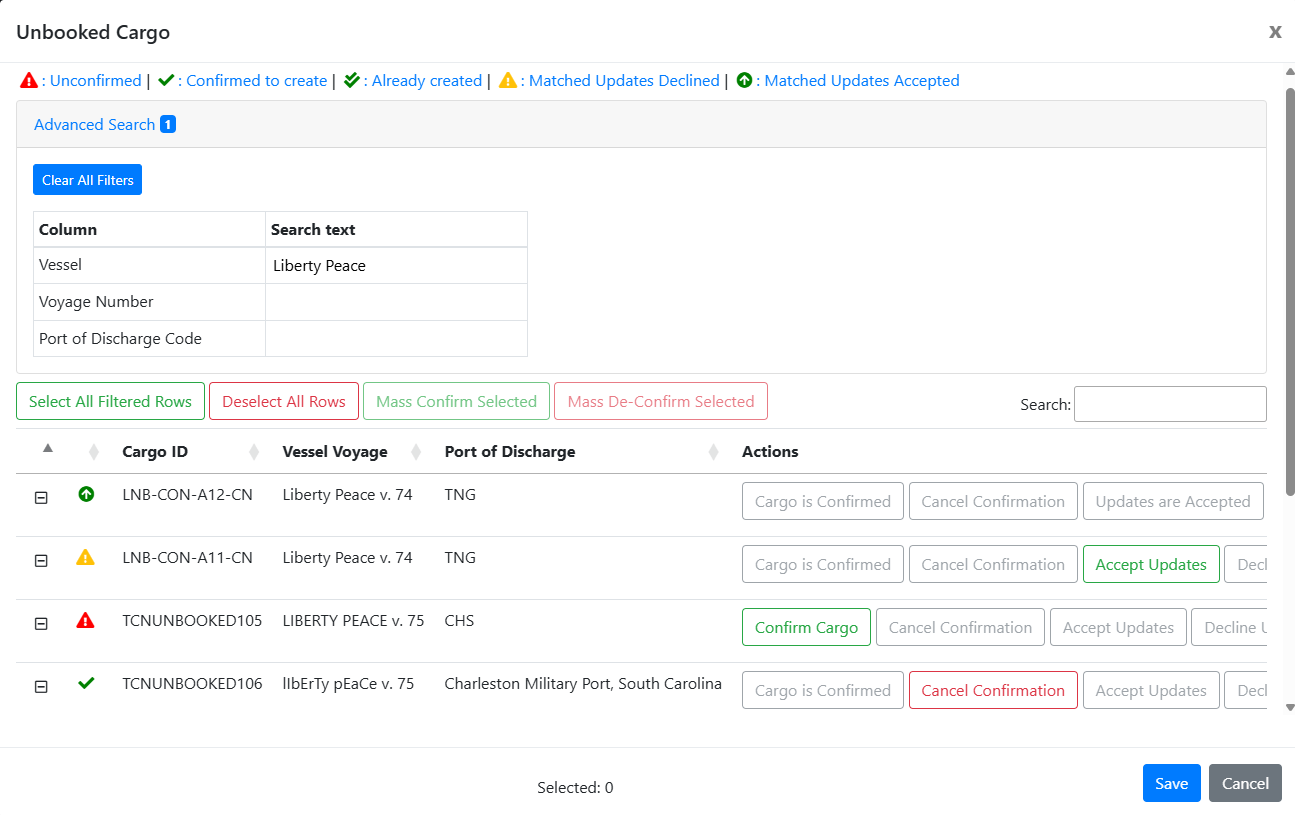
The Unbooked Cargo Modal has several icons and features.
- Unconfirmed - An Unbooked Cargo that has been uploaded, but is not yet scheduled to be created. Confirm the cargo's VSM Port Calls to create this cargo
- Confirmed to create - An Unbooked Cargo that has been confirmed and will be created. If this was done in error, you may De-Confirm to prevent creation
- Already created - After an Unbooked Cargo has been created, if the continue matching function is used, this indicates the cargo has already been created
- Matched Updates Accepted - After an Unbooked Cargo has been created, if data is uploaded in an On Ground Report for this TCN, the updates will be queued for update
- Matched Updates Declined - If updates to an Unbooked Cargo were uploaded by mistake, use Decline Updates to prevent data from updating. This icon means updates will not take place for this cargo
There is an Advanced Search to narrow down uploaded Unbooked Cargo. This may be useful if you want to filter a specific vessel and voyage to use the Select All Filtered Rows and Mass Confirm buttons. Vessel, voyage, POL, and POD must match to Mass Confirm.
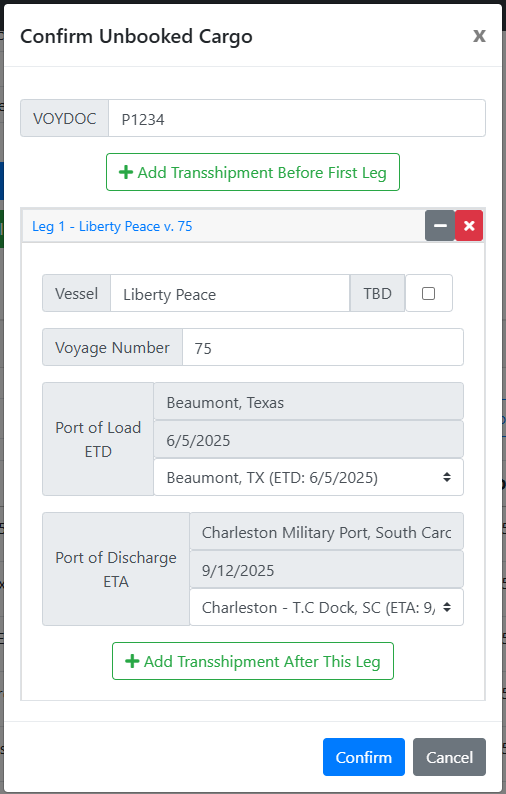
After creating an Unbooked Cargo, it will appear in the Port Cargo table and will be available for searches. Anywhere you see an Unbooked Cargo, the Booking Number will be listed as “N/A”. Next to the N/A in the Booking Number column, you may click on the “three layer” icon to view their Booking Level Details (more on that below).
¶ Updating Unbooked Cargo - Cargo Level Details
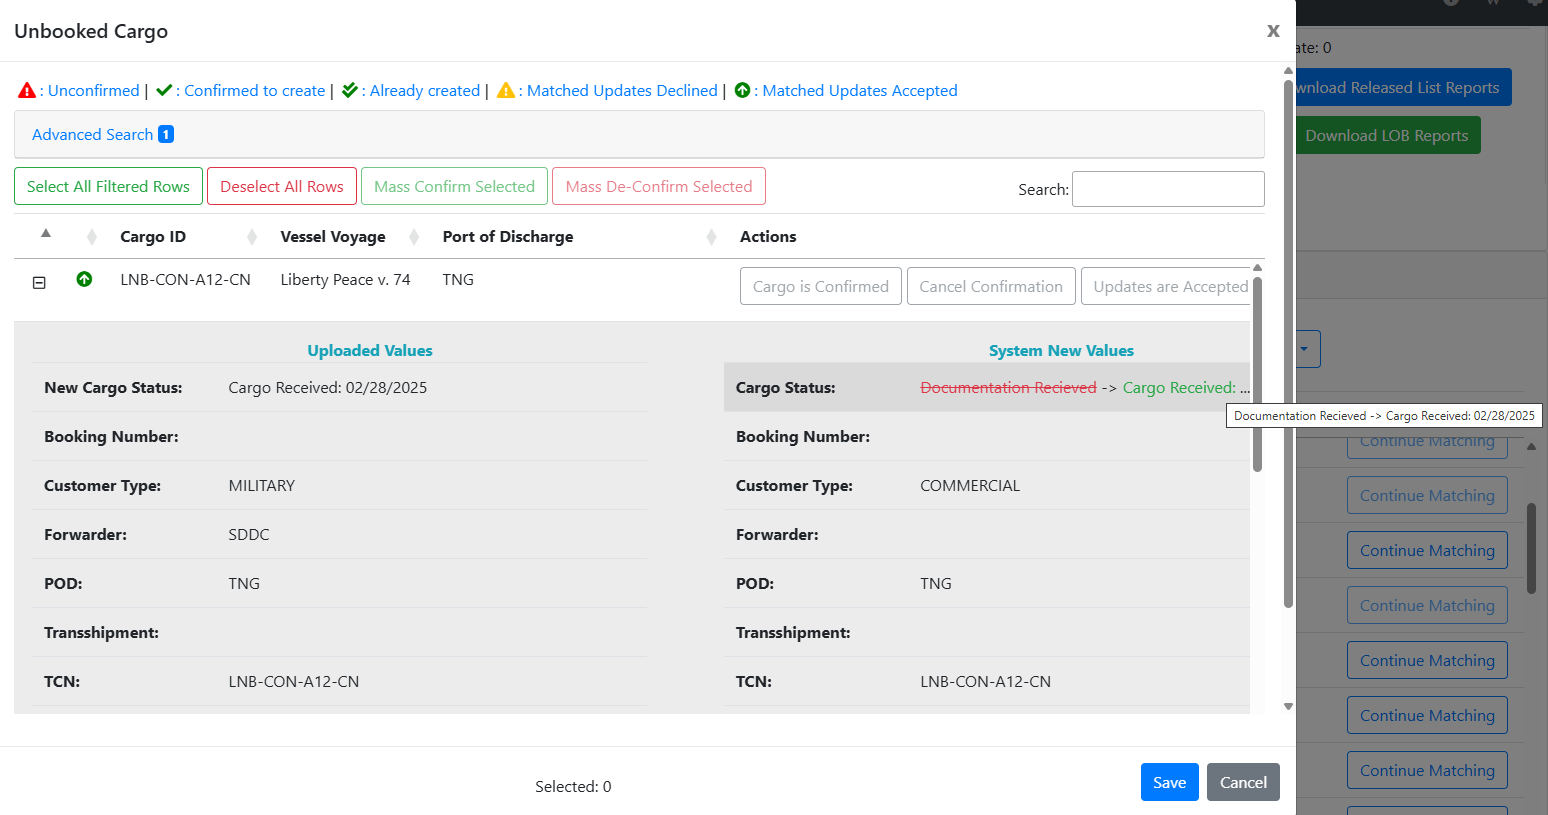
After an Unbooked Cargo has been created, it may be necessary to upload new standard cargo properties or events, such as a change in description, dimensions, or status (like Cargo Received or Loaded On Board). This can be done via On Ground Report, which will match the cargo by TCN.
If you wish to see what updates will be made, open the Cargo Details and you can see the Uploaded Values and the System New Values, which displays the changes. If a value has been truncated, it will have an ellipsis (…) indicating that there is more information. Hover the mouse over it to see the full data in the tooltip.
¶ Updating Unbooked Cargo - Booking Level Details (Adding, Updating, Deleting)
There may be scenarios where the customer has provided details about Unbooked Cargo that are typically saved at the Booking Level, such as F-Terms. They may even provide a Booking Number or PCFN that they intend for this Unbooked Cargo to be added to later. While formally adding cargo to a booking must be done via EDI, we can keep track of these Booking Level Details by using the Update Unbooked Booking Details spreadsheet template and toggling on the Update Unbooked Booking Details functionality.

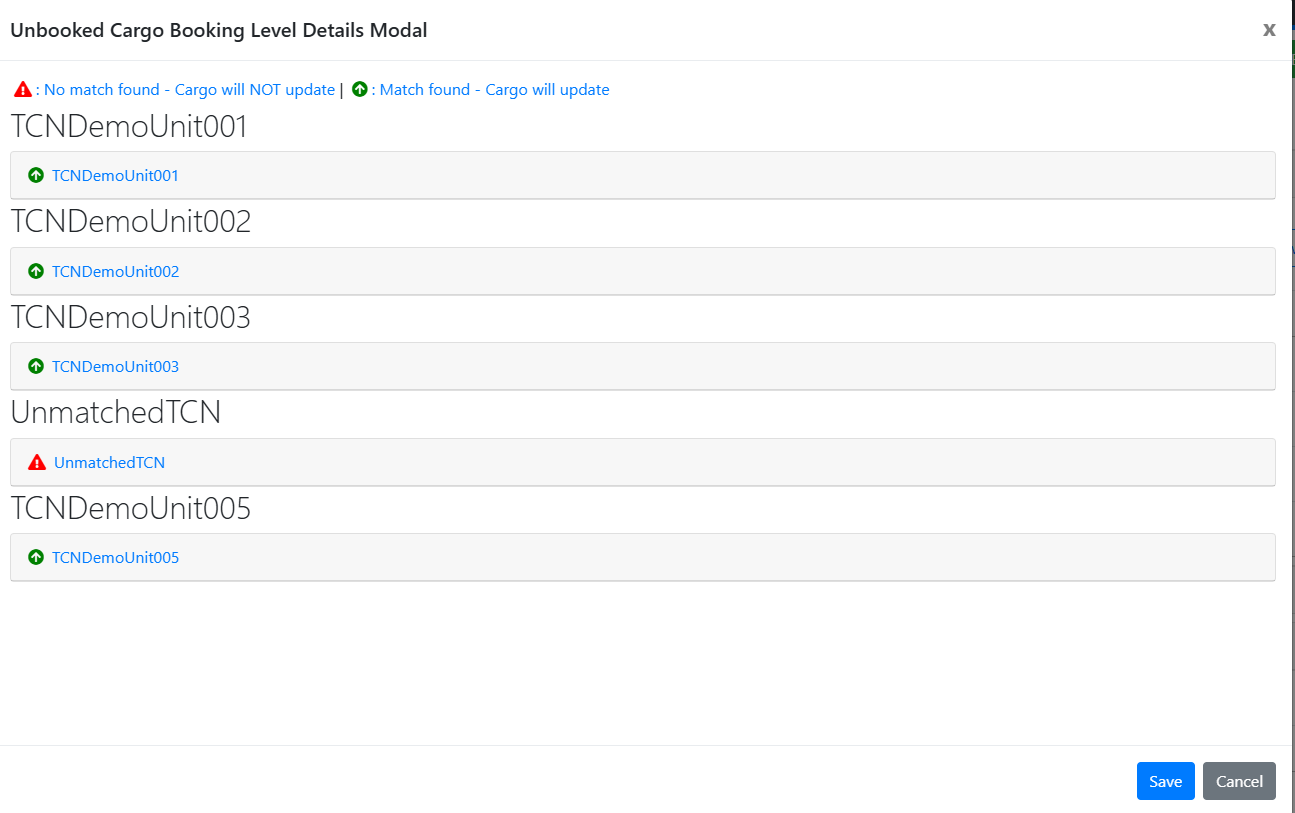
Once the spreadsheet has been loaded, the Unbooked Cargo Booking Level Details Modal will open. Each cargo will have an accordion with an icon. If the TCN provided matches an Unbooked Cargo, the Match Found arrow will be displayed and the Booking Level Details will be updated accordingly upon saving. If no match is found, no valid Unbooked Cargo match has been found. A match might not be found for several reasons, such as the Unbooked Cargo has not been created yet, there is a typo in the TCN, or the previously unbooked cargo has been adopted into a booking and is no longer eligible for these types of updates.
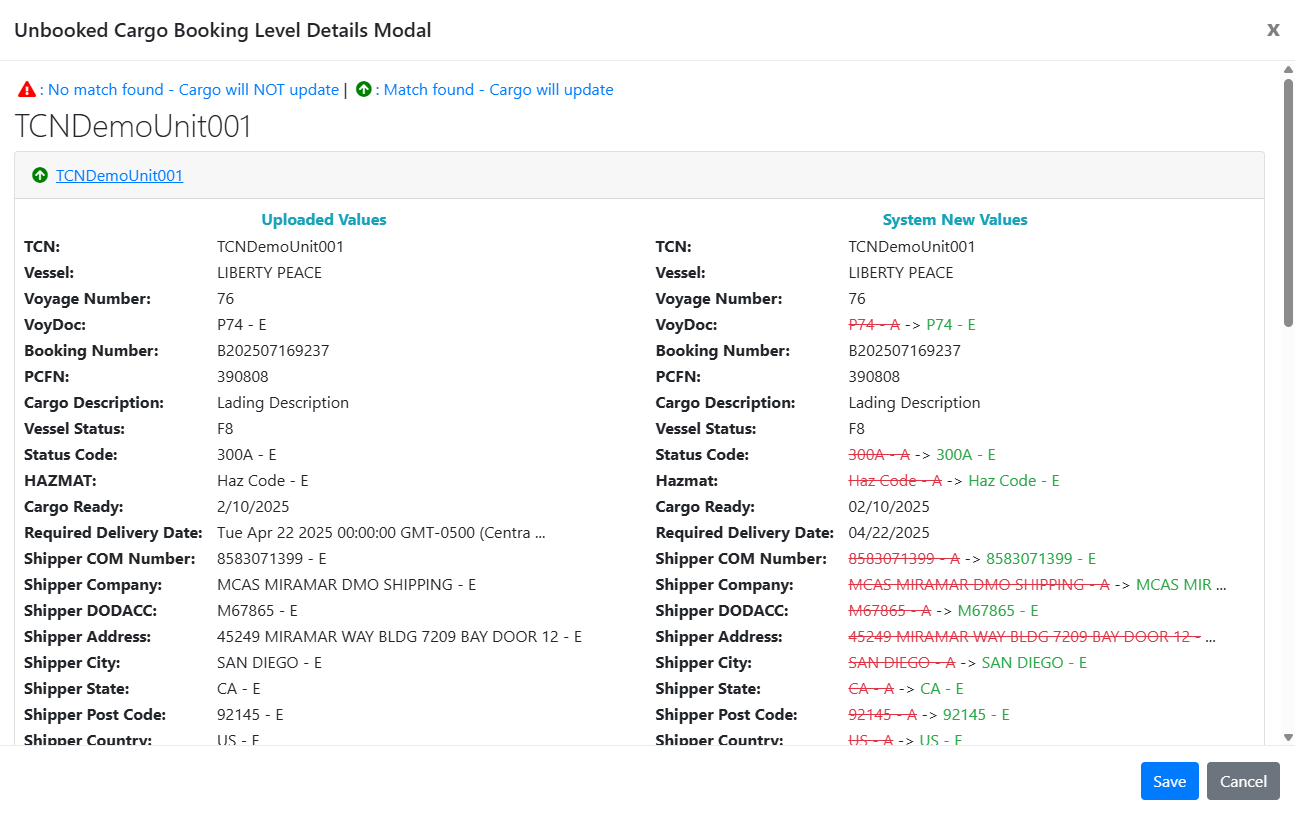
In the Update Unbooked Booking Level Details spreadsheet, values are updated in the following manner:
- Data entered: Update that field with the provided data
- No data entered: Do not change this property. If it is empty, it stays empty. If it already has a value, do not remove that value
- “DELETE” keyword entered: Remove the value previously placed here. This keyword is case sensitive. This is the only way to remove BLD data.
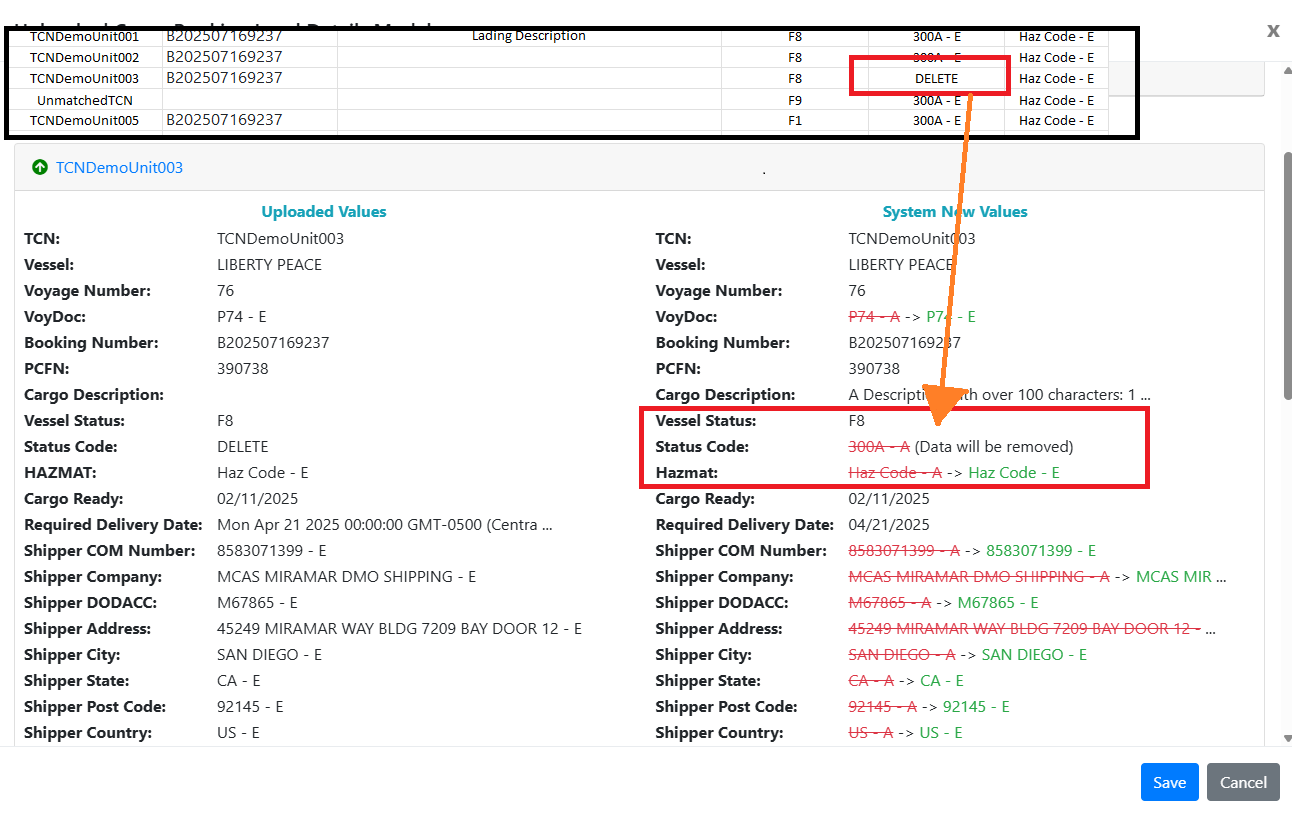
¶ Unbooked Cargo - “Tagged” properties and search queries
One feature of the Booking Level Details discussed above is that certain properties will “tag” that Unbooked Cargo. For example, if the client informed us that Unbooked Cargo with TCN “TCNDemoUnit002” is planned to be added to Booking B202507169237. We can add this as the Booking Level Details booking number to tag it to that booking.
If we view a tagged booking's details in the Booking Module, we will see the tagged Unbooked Cargo in the Prospective Unbooked Cargo Table. If there is no tagged Unbooked Cargo on a booking, this table will not appear.
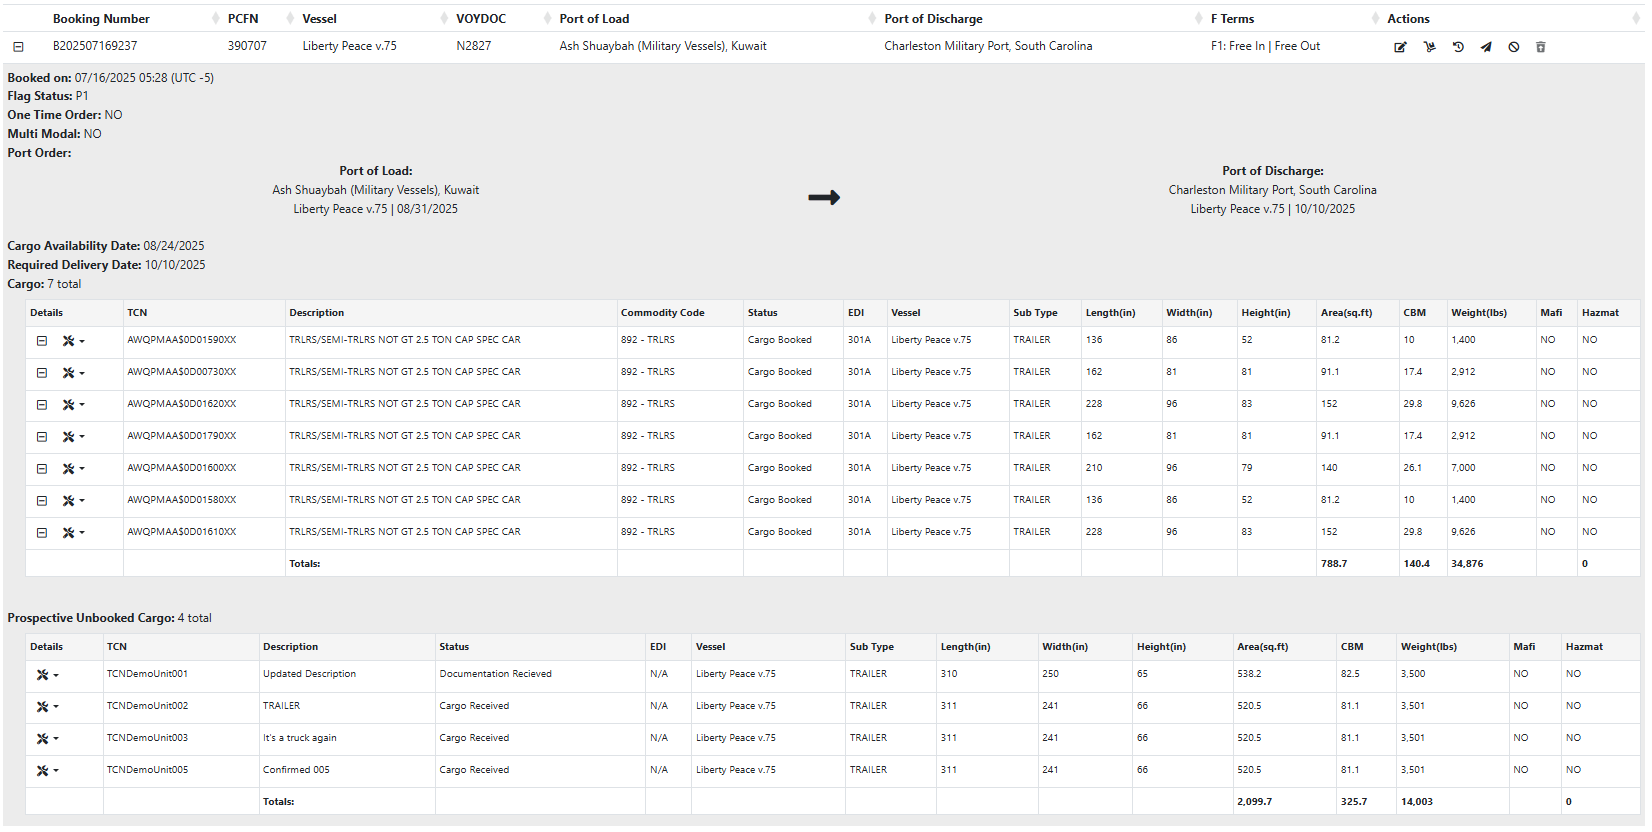
Additionally, in the Inventory and Report Module's Search Cargo functions, these tagged Unbooked Cargo will appear if they match the searches Booking Number, PCFN, or F-Terms. They will appear with no Booking Number since technically, they do not have one yet. These can be disabled from searches by changing the “Unbooked Cargo" dropdown from “Booked & Unbooked” to “Booked Only”.
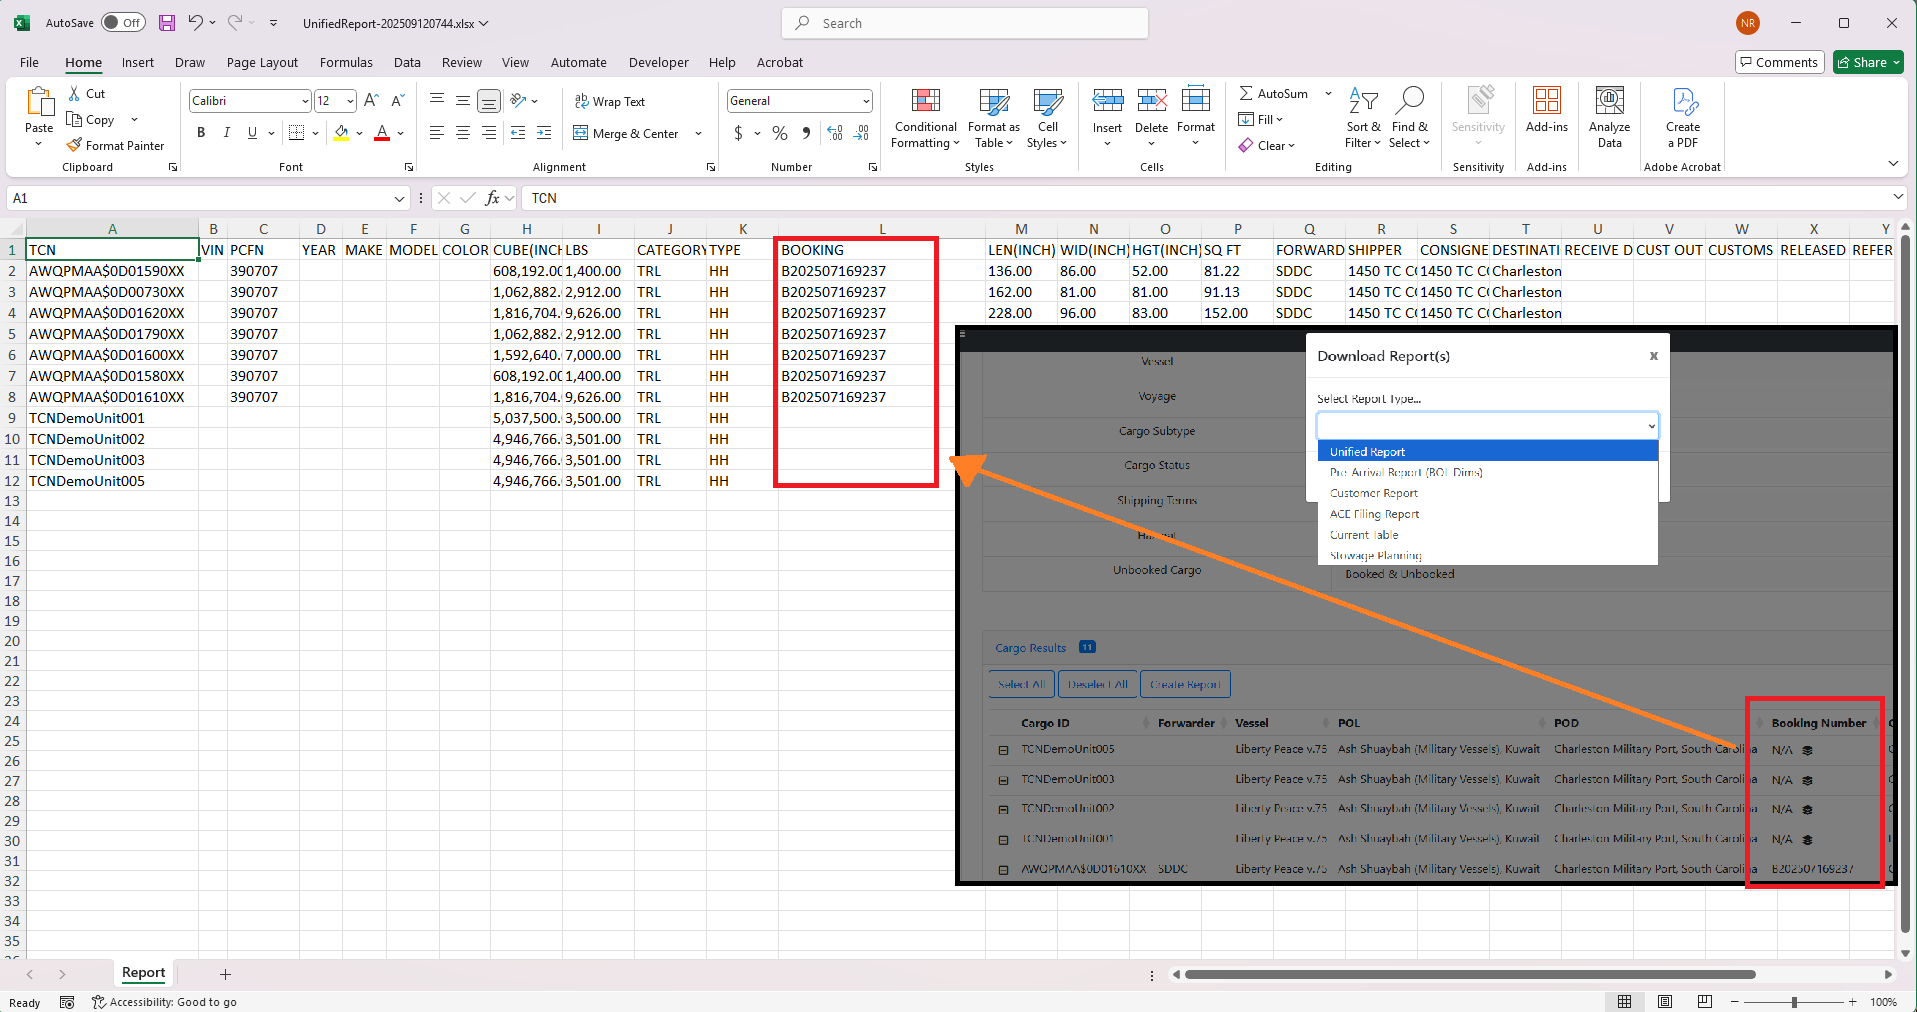
Unbooked Cargo will NOT appear in the Cargo Tracker until it has been adopted into a booking (see below).
¶ Adding Unbooked Cargo to a Booking ("Adopting" Unbooked Cargo)
To officially add an Unbooked Cargo to a booking, we MUST receive EDI that matches the TCN of the Unbooked Cargo. This may be either:
- A 300 New request that creates a new booking with this TCN
- A 300 Update request that adds this TCN to a booking that already exists
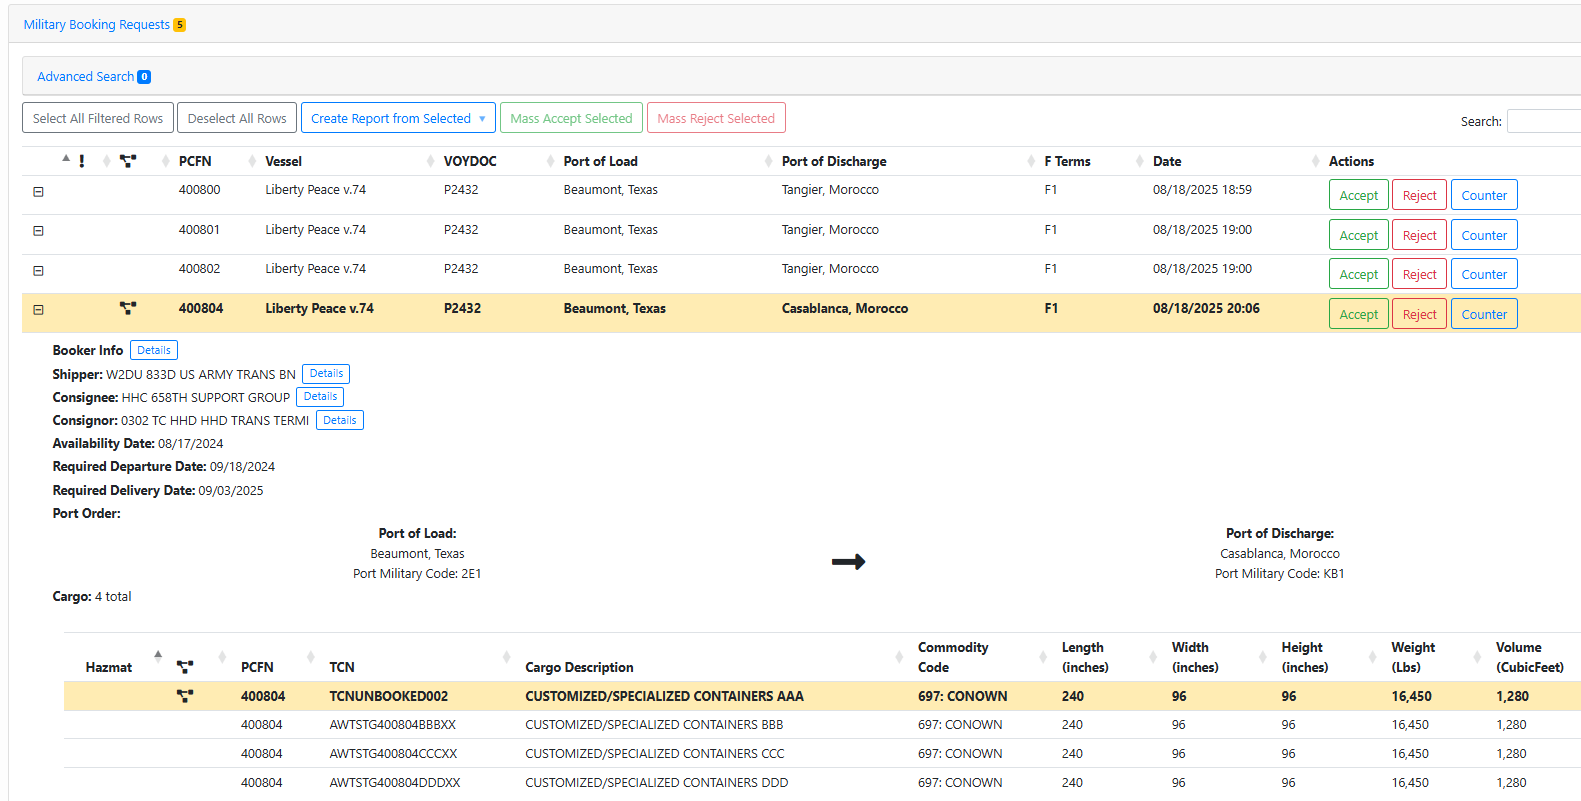
When a Military Request is loaded in the Booking Module, it will cross check the included TCNs with the Unbooked Cargo in the system. If a match is found, the booking request will be highlighted in yellow and have a “connection icon”. If you expand the booking details, you will see the TCN that matches is also highlighted and denoted with the icon.
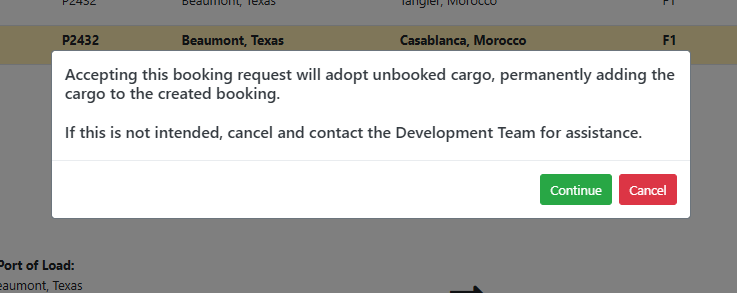
When accepting or countering the request, a warning modal will appear, informing you that this adoption will occur.
If you had a Placeholder TCN in place, you will need to change the TCN in the Edit Cargo module to match the request. It should then highlight the unit in yellow on the booking request, as discussed above. If it is not highlighted in yellow, the unit will NOT be adopted.
CARGO PROPERTY CHANGES - When an Unbooked Cargo is adopted, its current properties (such as dimensions, etc) will be OVERWRITTEN to reflect the values that were included in the 300 file. However, the Unbooked Cargo's current status and history will be preserved.
¶ Port Cargo
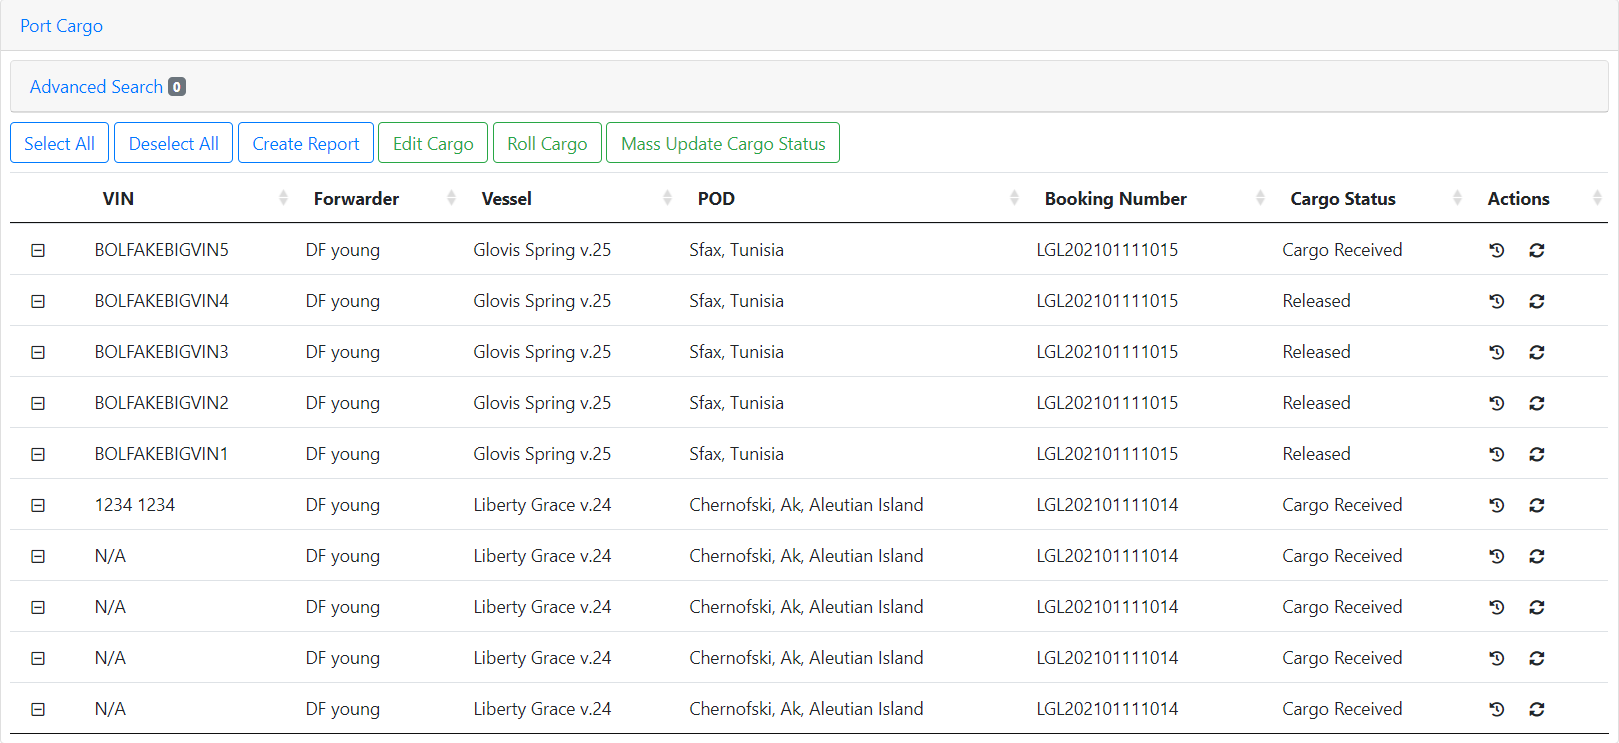
The first button in the actions column will open up a new page in order to show you the Cargo History of this cargo, while the second button will open up a new window allowing you to manually update the status of a piece of cargo.
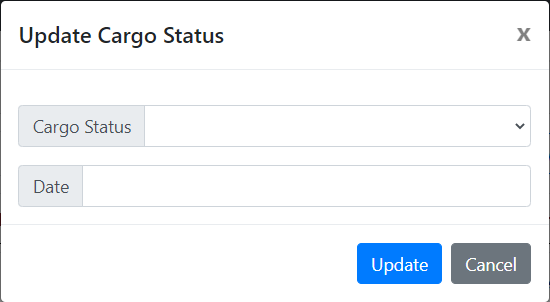
Both the ‘Mass Update Cargo Status’ and the regular Update Cargo Status buttons will bring you to this window where you may select a Cargo Status and the date that should be associated with it. Note that certain status will require additional information such as Released Vessel & Voyage.
NOTE: When releasing to a different Vessel & Voyage, the system will automatically roll the cargo onto that Vessel & Voyage.
For Example: If cargo was booked to Liberty Passion V.23 but released to Liberty Promise V.25 the cargo will automatically be rolled to the Liberty Promise V.25
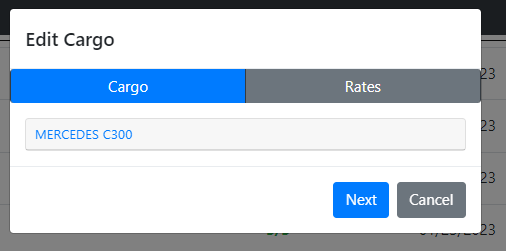
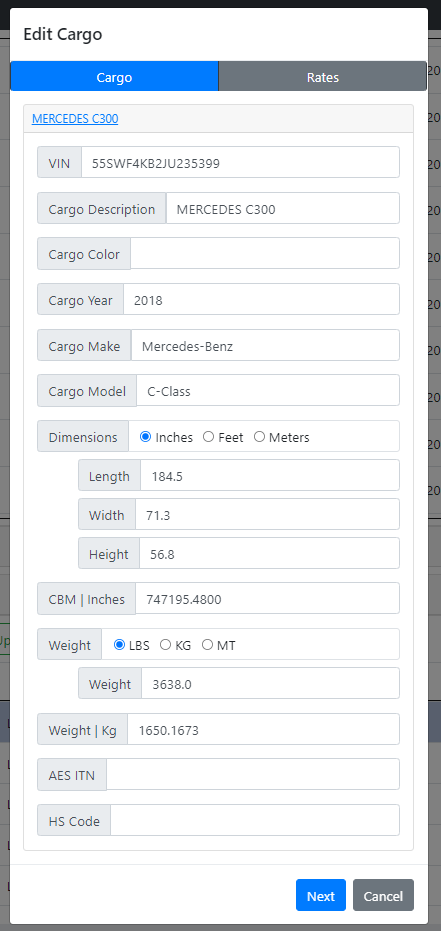
You may also choose to edit cargo. To edit an already uploaded piece of cargo, select the piece of cargo on either the ‘Port Cargo’ or ‘Search Cargo’ tab. Then select “edit cargo”. Next, the below will appear:
You may also choose to create a report through this section, although this can also be done via the ‘Search Cargo’ tab where you can go to create Reports using a larger pool of cargo. The ‘Search Cargo’ tab includes all cargo in the system, while the ‘Port Cargo’ tab only includes cargo that is an ‘on ground’ status. Additionally, the ‘Report Module’ has all the same capabilities as the ‘Search Cargo’ tab, minus the ability to update any cargo.
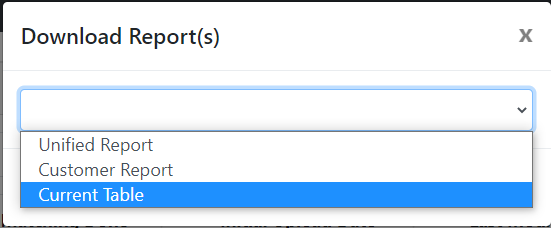
The ‘Create Report’ button will open up a window that will prompt you to choose which type of report you wish to create. The ‘Current Table’ option will use the only the cargo currently shown on the table in order to create the report. This functionality was created in order for users to create a multitude of different reports by themselves. For example: if a user wanted to create a Release list for this Port, all they would have to do would be to filter the table to show only Released cargo and the using this ‘Current Table' option.
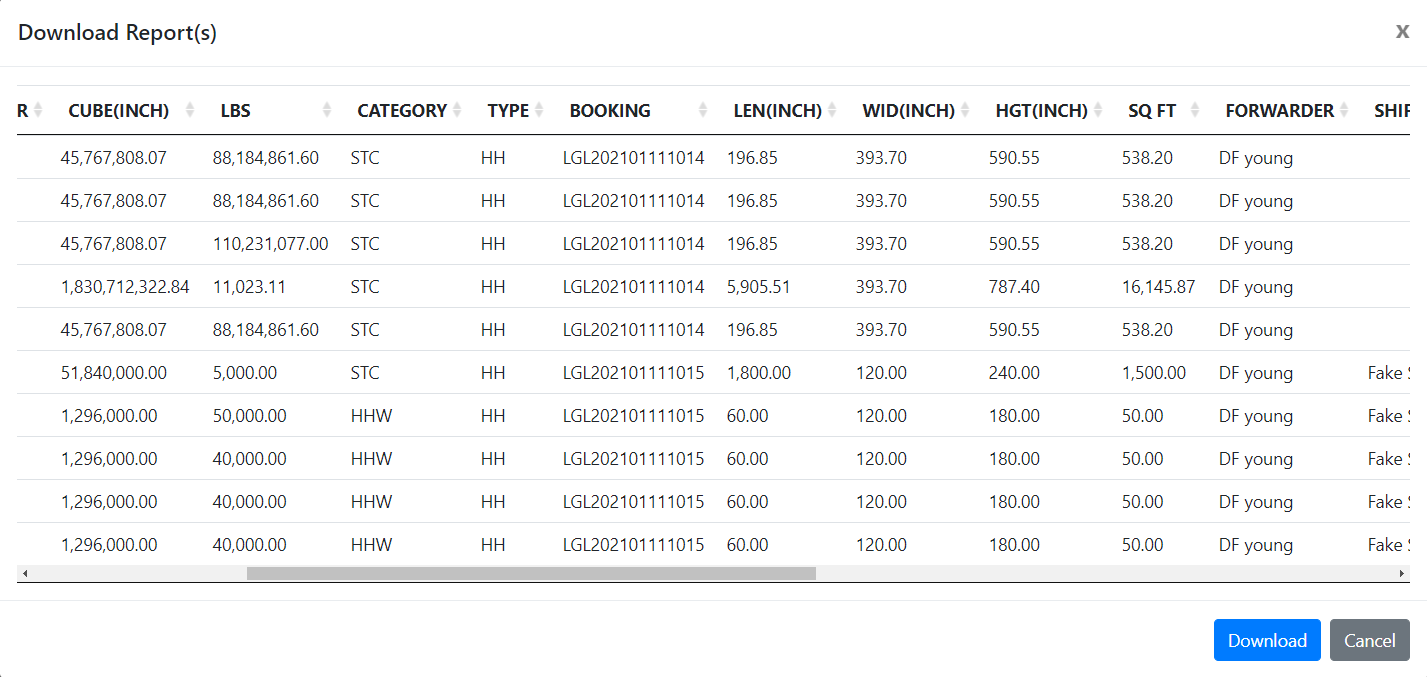
Once a report has been selected a larger window will appear previewing what the excel sheet will look like.
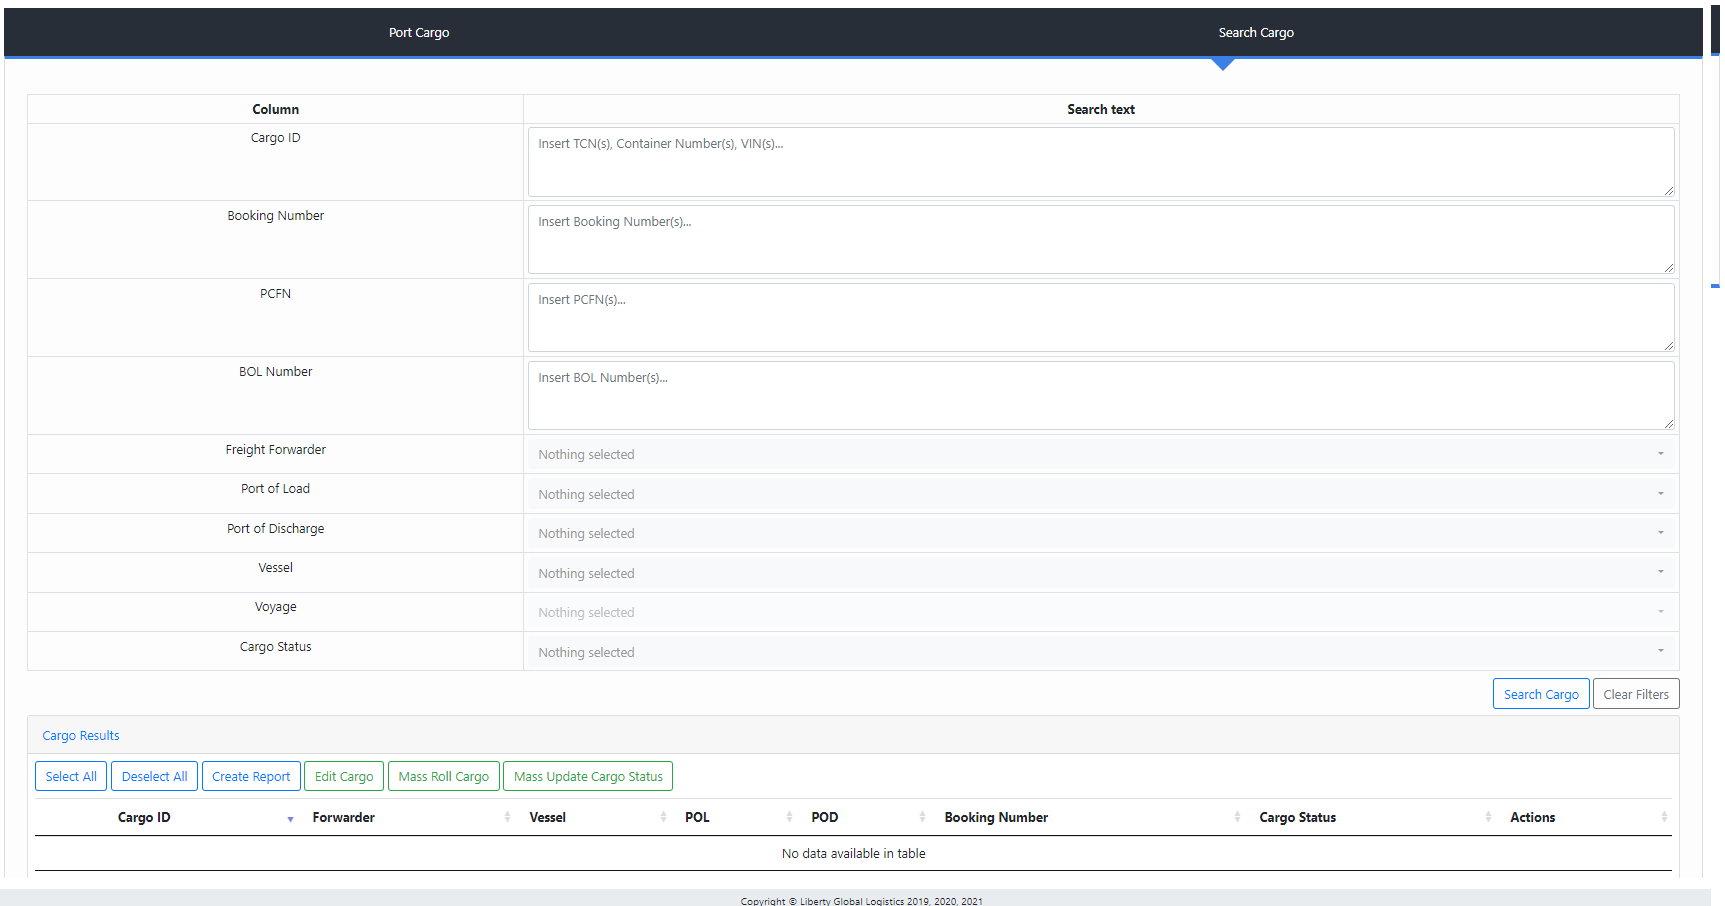
The ‘Search Cargo’ tab was created to allow users to search the entire system for cargo; Whatever is entered in the search will be matched against every piece of cargo whether it is in the booked phase, or the BOL phase. Once the user has entered in criteria the ‘Search Cargo’ button will initiate the filter and return any and all cargo that match the search description. Once all cargo have been found they will be loaded into the table where the user will have access to all the same functionality as the previously mentioned Port Cargo section. Additionally, the ‘Report Module’ shares the same capabilities as the ‘Search Cargo' tab, minus the ability to update any cargo.
NOTE - Cargo or other inputs must be selected from the drop down menu that appears or it will not appear in the search bar
¶ Important Notes
If you have any questions or issues to report regarding the Inventory Module, please submit a help desk ticket with “Inventory Module Help/Bug” in the subject line.